Online platforms have boomed since COVID. It’s never been easier to formalize a business through registration with the government. And with the changes in requirements and the wide adoption by LGUs of online platforms, the documented procedures found online need updating. This guide is meant to be an updated and complete walkthrough on how to register a business in the Philippines, post-COVID.
I’ve included my hands-on experiences to supplement what’s found online. They’re listed in chronological order so it’s easier to follow. (Consider bookmarking this page). Here’s a summary of the contents of this guide.
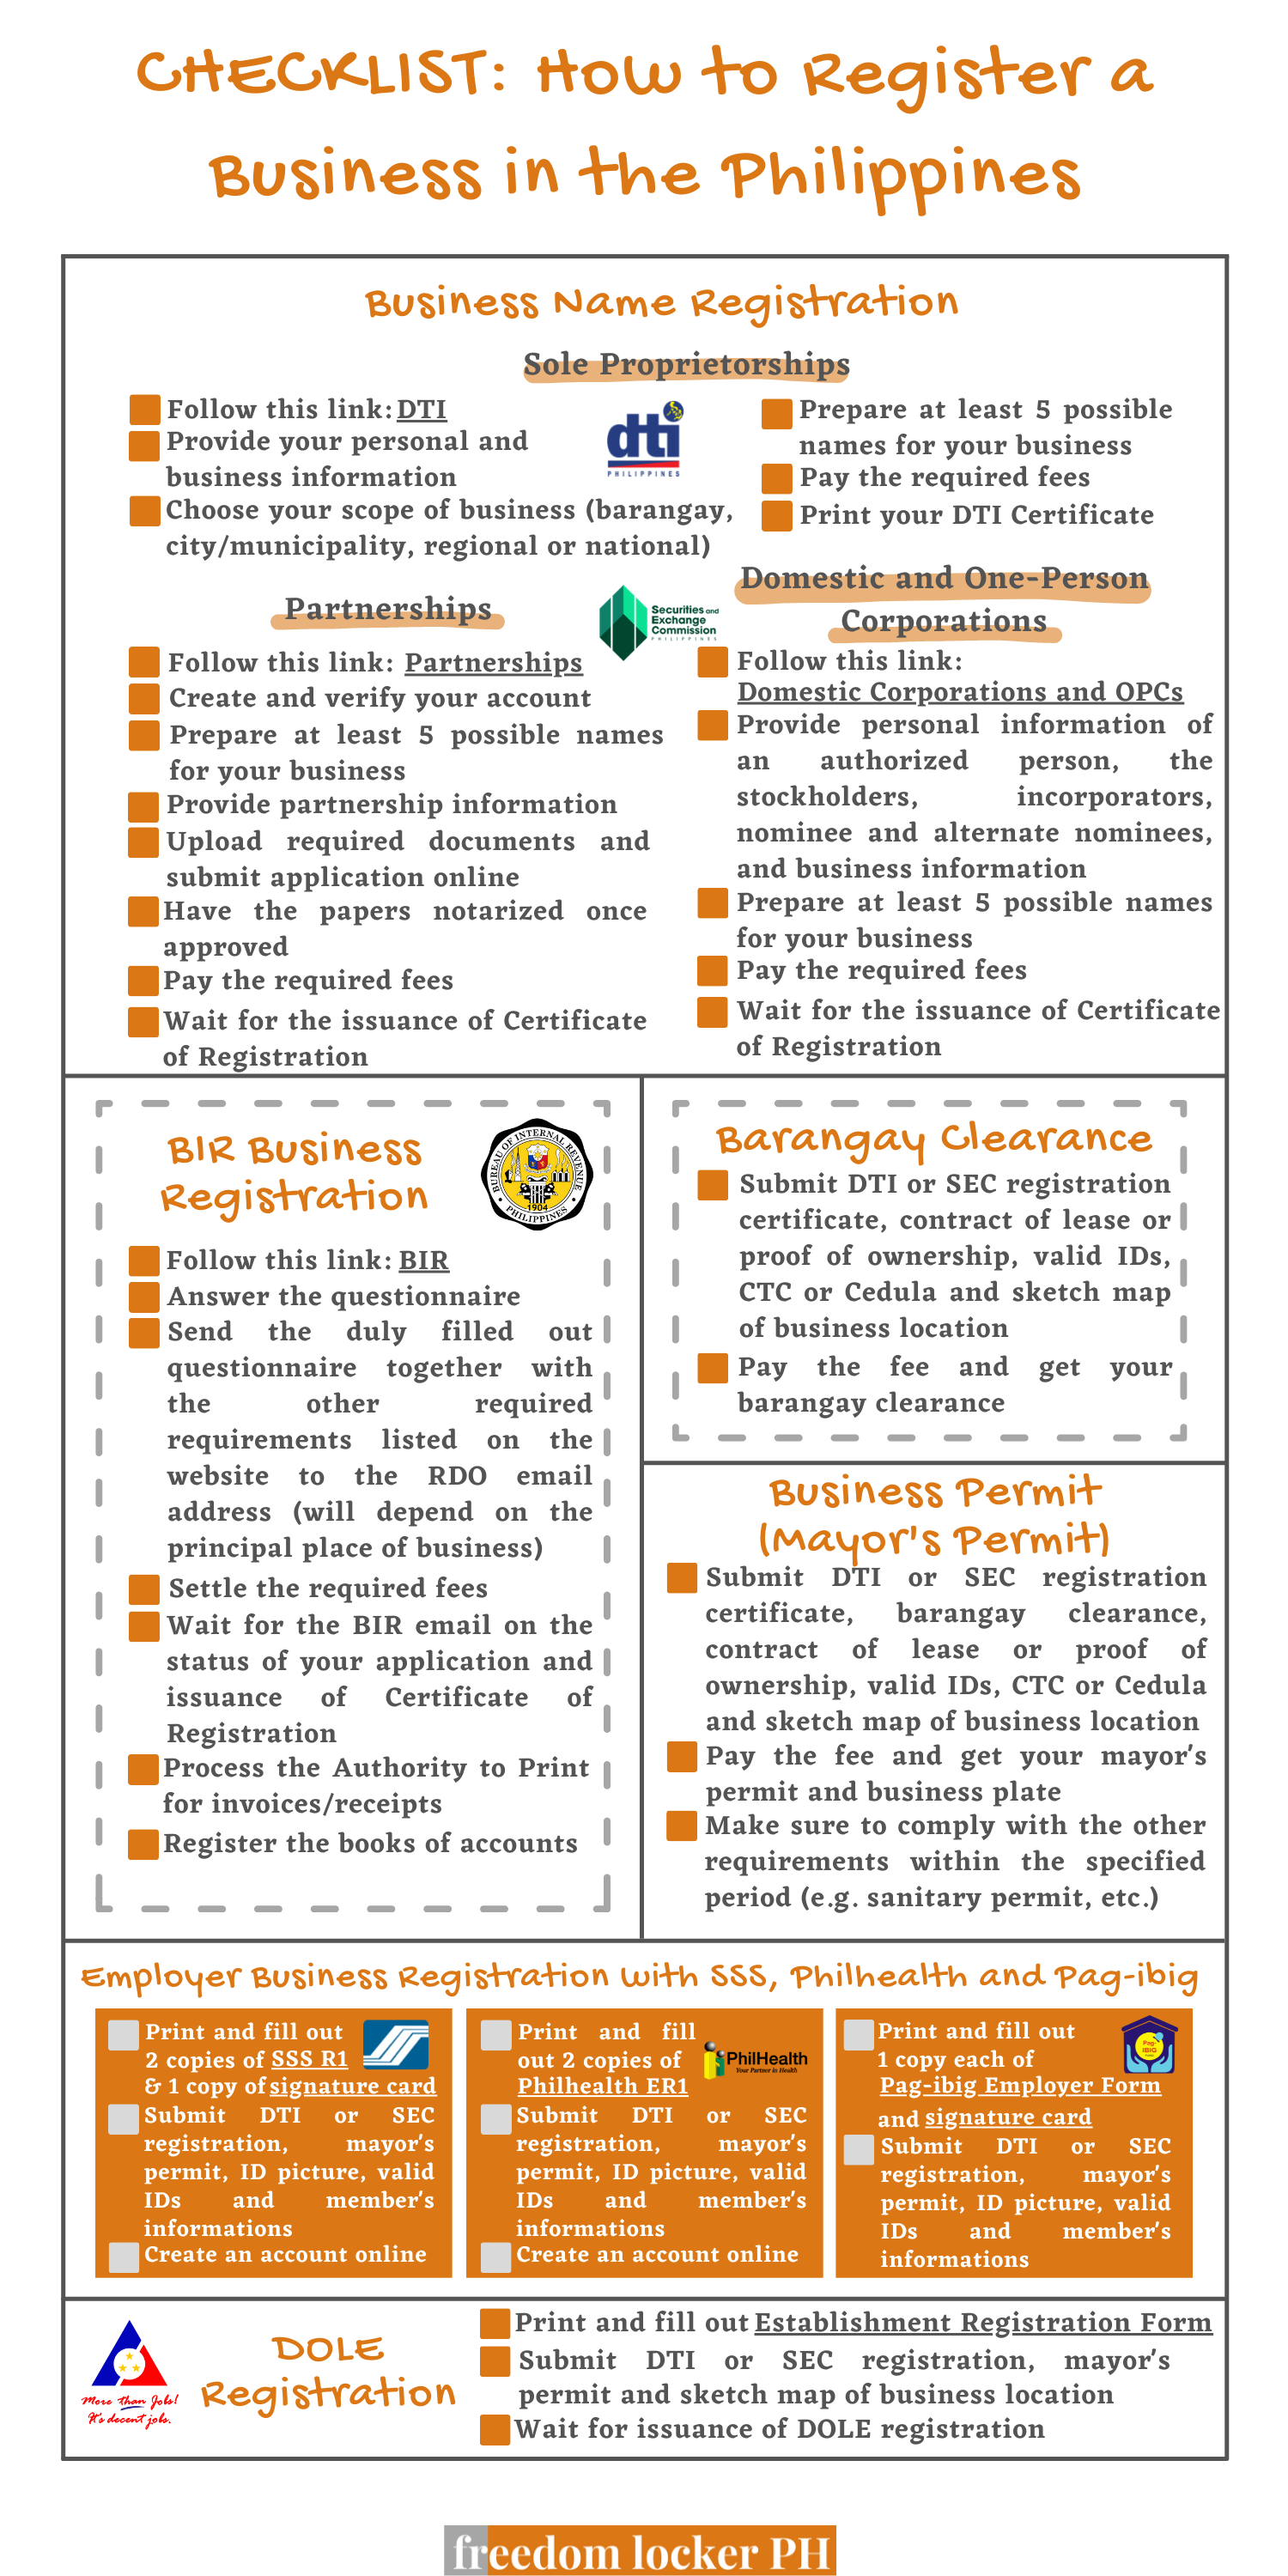
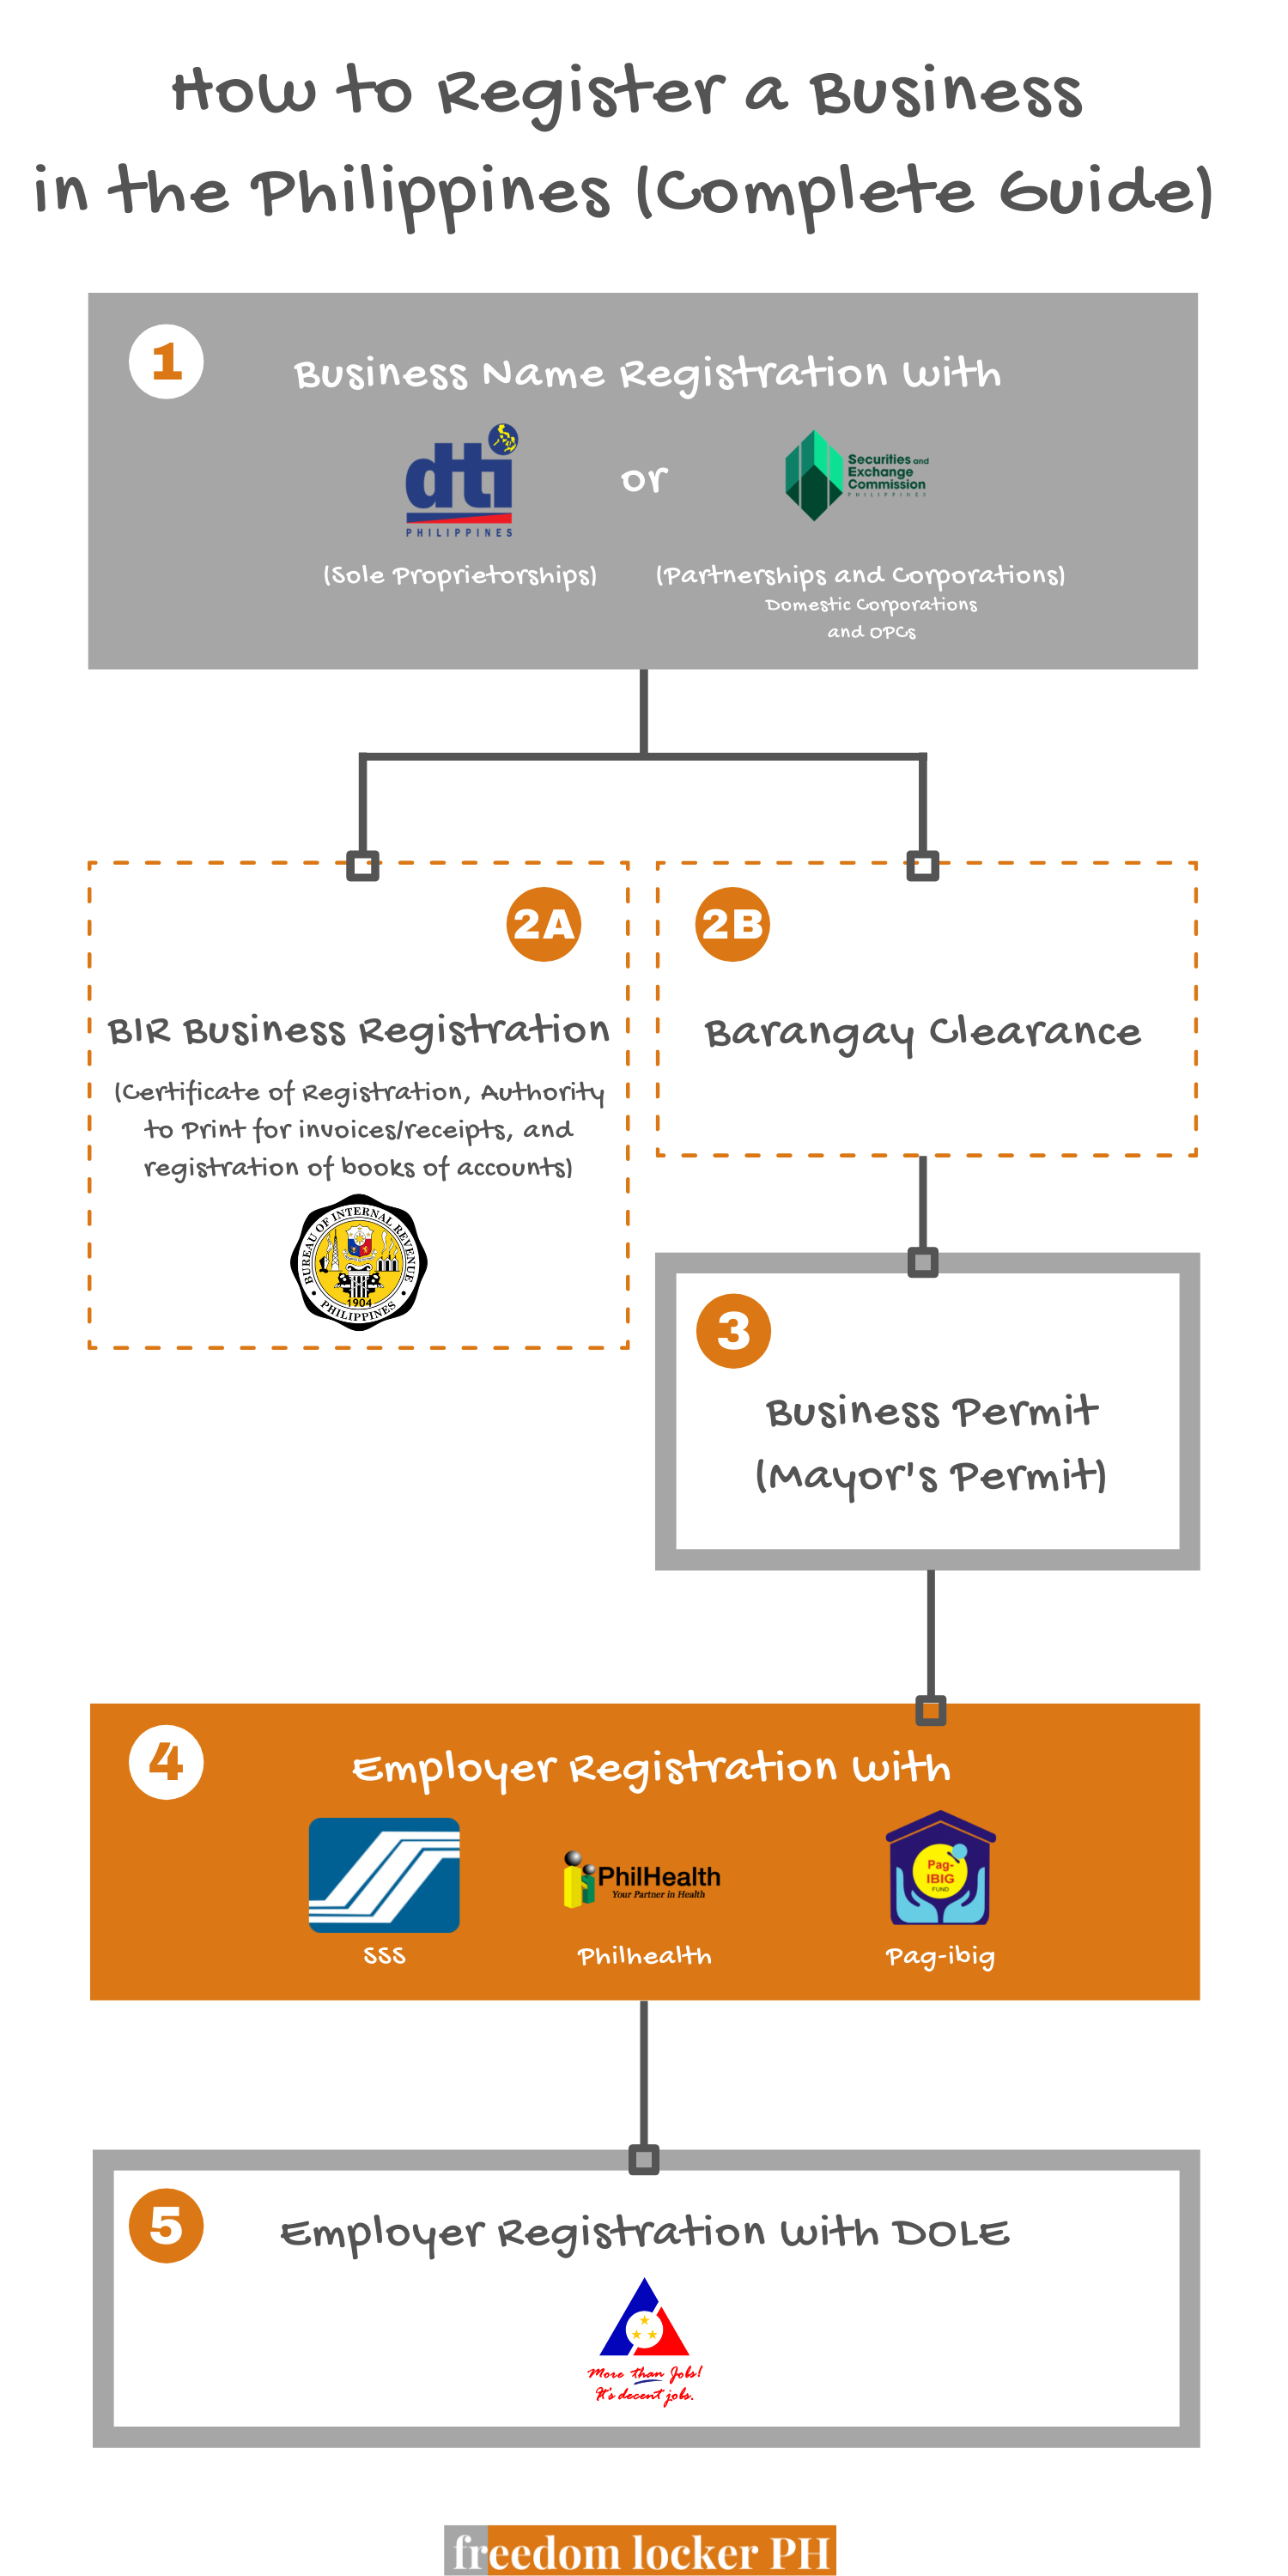
First, you’ll need to register your business name with either the DTI or SEC. This is followed by your Barangay Clearance application and Business Permit. This was then traditionally followed by the BIR registration but, interestingly, it’s now possible to go ahead with the BIR registration right after the business name registration. Next are your SSS, Philhealth, and Pag-IBIG applications. And finally your business’s registration with the DOLE.
The entire business registration process is indeed a lengthy one, but these online platforms only help in speeding up the system. That holds true whether you’re looking to register a small-scale business or a large consultancy firm in the Philippines. Let’s go through each step in detail.
(You can also download the summary and checklist at the bottom of the post.)
Page Contents
Step 1: Business Name Registration
This step answers the question How to Register a Business Name in the Philippines.
Regardless of the type of business — sole proprietorship, partnership, or corporation — your first step is to register the business name. This is done with either the DTI (sole proprietorship) or SEC (partnerships and corporations).
Sole Proprietorship
(If you’re registering a partnership or a corporation, click here to forward to the next section.)
This section is on the business name registration of sole proprietorship businesses in the Philippines, administered by the Department of Trade and Industry (DTI). Sole proprietorships are the easiest to form and are often the only practical option for businesses in provinces without local SEC offices.
When people ask how to register a small-scale business, sole proprietors are what usually come to mind. But it is worth saying that there are medium and large-scale sole proprietorships.
If you do decide to proceed as a sole proprietor, be ready to provide these personal and business details.
New business name registrations via DTI are accomplished here: https://bnrs.dti.gov.ph/registration
Consider bookmarking it because this is the same link you’ll use to continue an ongoing application, process transaction inquiries, renewals, cancellations, and requests for a certificate.
Personal Information
Once you get to DTI’s new business name registration form (see the preceding link), you’ll need to read and confirm their terms and agreement for business registrations. You’ll then provide at least the following personal information:
- Name
- Citizenship
- Civil status
- Date of birth
- Gender
Scope of Your Business
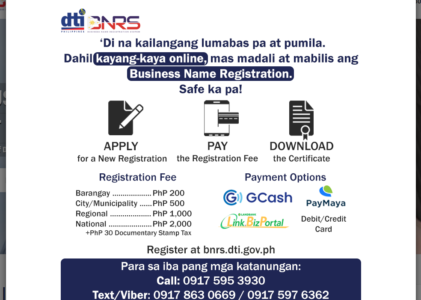
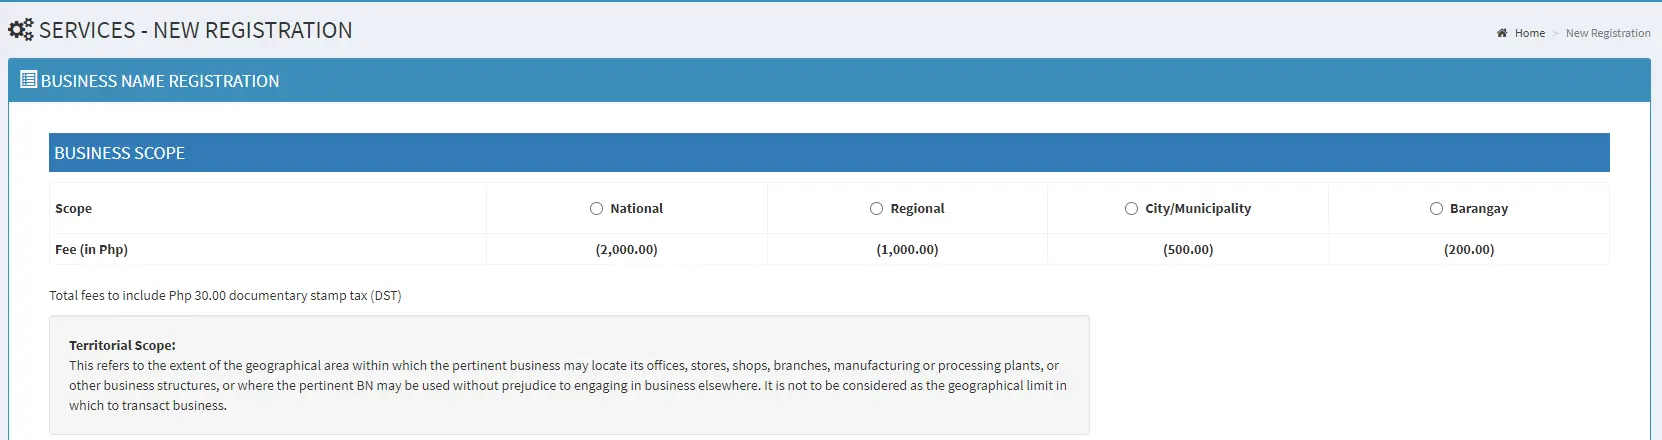
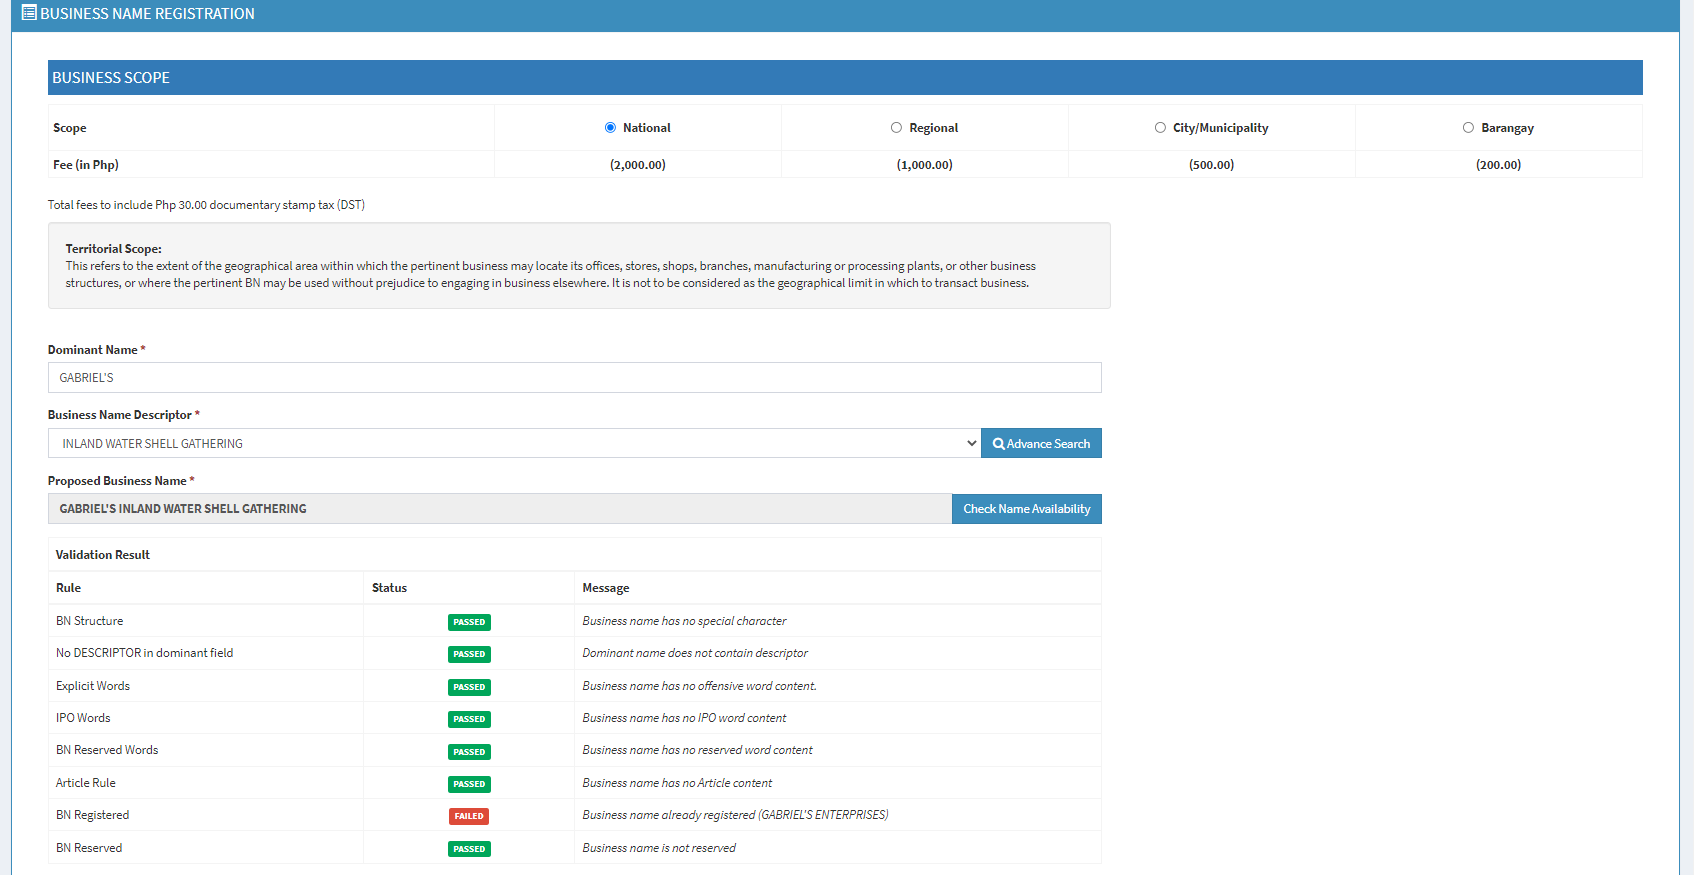
The next step is to choose your business’s scope. This is basically the geographic coverage of your business with the following options. Smaller coverage areas will cost less than larger coverage areas:
- Barangay (Php 200.00)
- City/Municipal (Php 500.00)
- Regional (Php 1,000.00)
- National (Php 2,000.00)
Here’s a screenshot of the applicable fees per scope:
How do you choose the scope of your business? That’s entirely your choice, but here are a few points to keep in mind.
If your business scales up and you decide to change from, say, regional to national, there will be corresponding fees for the revision. So if you’re unsure, but believe there’s a chance for the business to grow beyond your initial plans, then probably err on the side of the larger scope. The differences in fees aren’t significant anyway, plus you save on reprocessing fees when you do decide to expand.
There are also no rules against operating on a smaller Barangay level, for instance, when your allowed scope is something larger, like maybe National.
But if your budget is limited and/or you’re certain of the scope of your business, maybe out of practicality or something else, then the smaller coverage areas are certainly available options.
(Be savvy with your operations. Here are 25 Smart Ways to Lower Your Break-Even Point and Profit Faster, with Infographic)
List of Possible Names for Your Business
When choosing a name for your business, prepare at least 5 dominant names to pair with your business name descriptor. So what’s a dominant name and what do all these mean? Consider the food stall “ABC Food & Beverage” as an example.
- ABC = dominant name
- Food & Beverage = business name descriptor
In other words, the dominant name is the branding of your business while the business name descriptor is just as it sounds — a descriptive name for your business.
Your complete business name is the combination of these two.
Tip: You will have the option to place the business name descriptor before or after the dominant name.
The 5 dominant names are your backups in case your initial choice(s) is(are) disapproved.
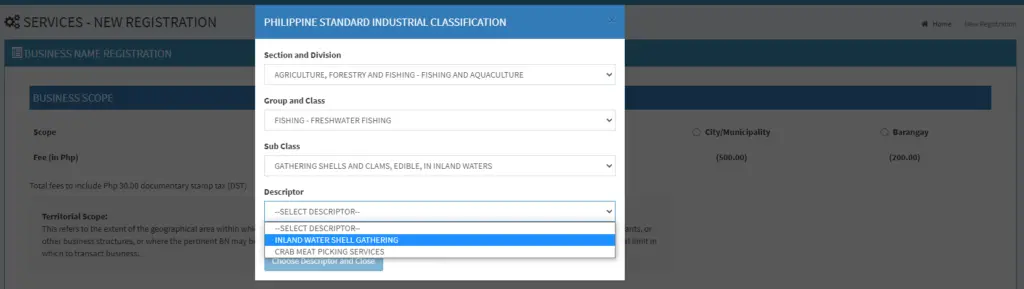
Business name descriptors are determined by the Philippine Standard Industrial Classification for the applicable section and division, group and class, subclass, and descriptor. See these samples from DTI.
(To know more about DTI’s Business Name Law, see their Terms & Conditions here.)
Pressing the button ‘Check Name Availability’ will then display the two naming order options as mentioned earlier (i.e., dominant name before or after the business name descriptor). You may then select ‘Validate Business Name’ to check the availability and compliance of your business name.
If your proposed name is rejected, the reason(s) for disapproval will be provided. See this sample:
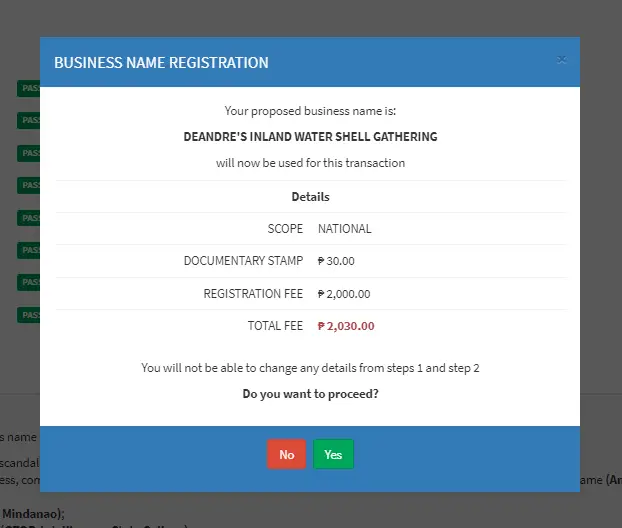
Otherwise, a new window will prompt you to confirm the business scope and business registration name of your application. Confirm this to show another screen with your reference code.
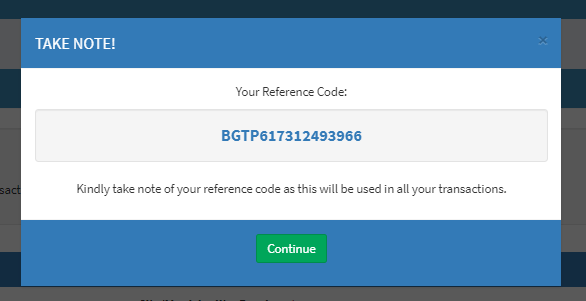
Tip: Make a note of the reservation code. You’ll use it to finish incomplete (draft) applications. This code is also for your online payment.
After this step, some more business and personal details will be requested. These include your email address, TIN number, etc. Refer to the screenshot below for a full list of the required details:
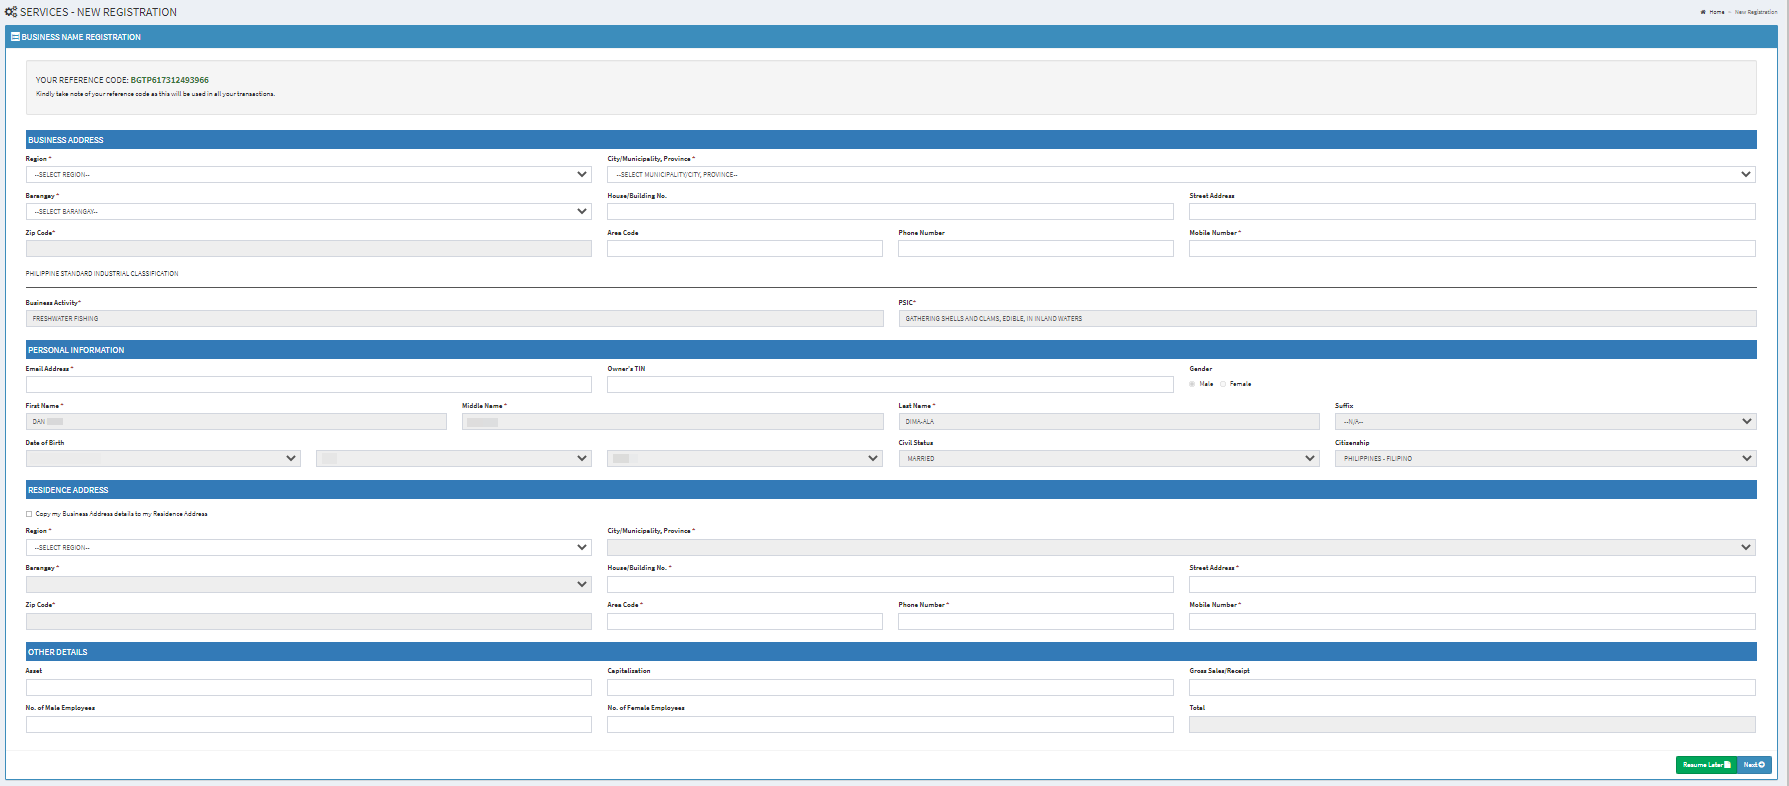
You may no longer make changes once this is confirmed.
Payment of DTI Registration Fee
The Undertaking is available for download. You may pay the required fees, plus corresponding transaction fees, thru DTI’s merchant partners as shown below. (See screenshot)
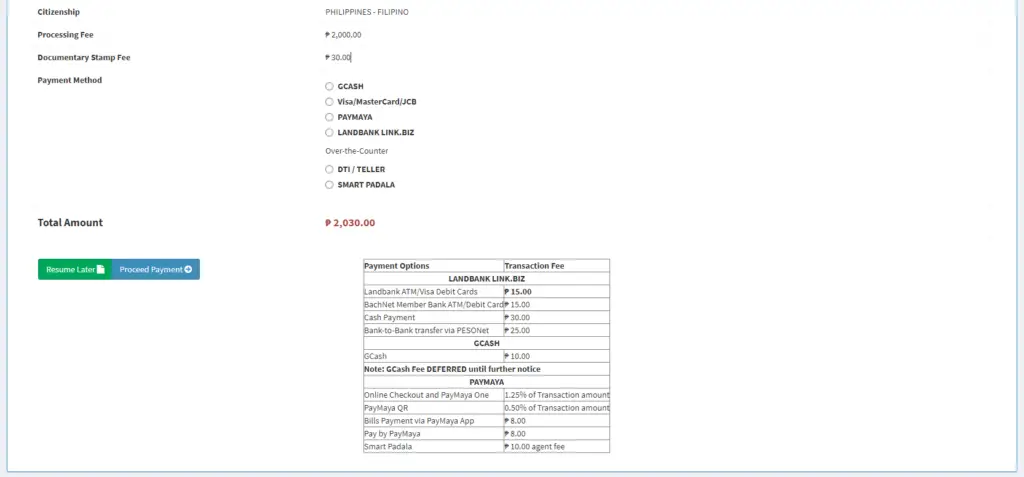
Available payment methods include GCash, Visa/MasterCard/JCB, PayMaya, Landbank Link.Biz, and over-the-counter via DTI Teller or Smart Padala.
The DTI registration fee, based on our chosen business scope (i.e., National), is Php 2,000.00, with a documentary stamp fee of Php 30.00.
Transaction fees vary per payment method as summarized in this table (This is the same table from the screenshot.)
Table of Transaction Fees for DTI Permit
| Payment Options | Transaction Fee |
| ——————————-Landbank Link.Biz | |
| Landbank ATM/Visa Debit Cards | Php 15.00 |
| BachNet Member Bank ATM/Debit Card | Php 15.00 |
| Cash Payment | Php 30.00 |
| Bank-to-Bank transfer via PESONet | Php 25.00 |
| ——————————-GCash | |
| GCash | Php 10.00 |
| Note: GCash Fee DEFERRED until further notice | |
| ——————————-PayMaya | |
| Online Checkout and PayMaya One | 1.25% of the transaction amount |
| PayMaya QR | 0.50% of the transaction amount |
| Bills Payment via PayMaya App | Php 8.00 |
| Pay by PayMaya | Php 8.00 |
| Smart Padala | Php 10.00 agent fee |
Tip: Remember to pay the fee within seven (7) days from the date of application to secure your business name registration.
You can also go to ‘Transaction Inquiry’ to download your certificate after payment has been made.
Tax Incentives for BMBE
Tip: Not a lot of people know this, but the government grants tax incentives to Barangay Micro Business Enterprises (BMBE) registered entities.
BMBEs are businesses with total assets of less than Php 3 million, including assets from loans but excluding the value of land where the business or equipment is situated.
To apply as a BMBE entity, you’ll need to submit the duly filled out BMBE Registration Application Form and passport sized-pictures to the nearest DTI branch. (See the list of DTI branches here.)
How do you avail of the tax incentives for BMBE?
To avail of the tax incentives for BMBE, you’ll need to complete your BIR registration (refer to the guidelines on BIR registration below) and make sure the Certificate of Registration (COR) is stamped as a BMBE.
Partnerships and Corporations (Including One-Person Corporations) in the Philippines
How you start either a corporation (including a one-person corporation) or a partnership, in the Philippines, follow the same steps. For both business types, the business name registration is managed by the Securities and Exchange Commission (SEC).
In 2019, the SEC finally allowed the setting up of One Person Corporations (OPCs).
Follow these links for the correct website on business name registration for domestic corporations or partnerships:
- Partnerships: https://crs.sec.gov.ph/
- Regular Domestic Corporations and One Person Corporations: https://secwebapps.sec.gov.ph/application
(Click here for the next section on Corporations.)
Steps to Register Partnerships in the Philippines
Creating your account
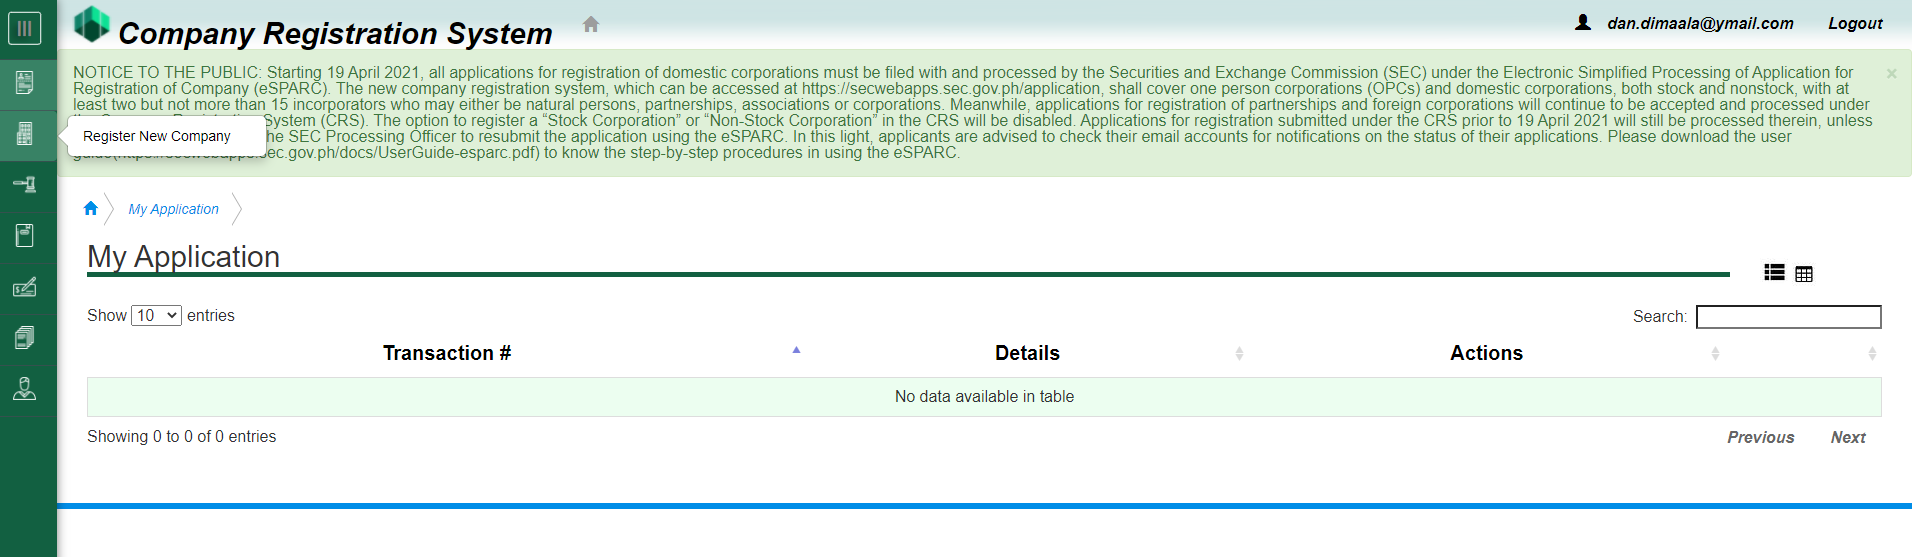
Once you’re on the website (again, make sure you’re on the right website for partnerships, https://crs.sec.gov.ph/), create, verify, and log on to your account to access the SEC online registration.
Then select “Register New Company” as seen on the left-hand side of this screenshot:
From here, select the company type and company classification, as well as the industry type (i.e., Major Industry Classification and Subclass). Don’t worry, the list of options will be available in the drop-down button on the website.
Verify the Partnership’s Name
Next, enter your proposed company name and select your preferred suffix. Once filled out, press ‘Validate’ and wait for the results to appear. A very common reason for rejections is having a close or similar name with existing registered business names.
If you want to appeal your proposed name, you’ll need to check a box to appeal and upload an appeal document in PDF format. (I, unfortunately, did not find a template for the appeal document, or at least one that’s recommended by the SEC, so I guess it’s whatever you think supports your case.)
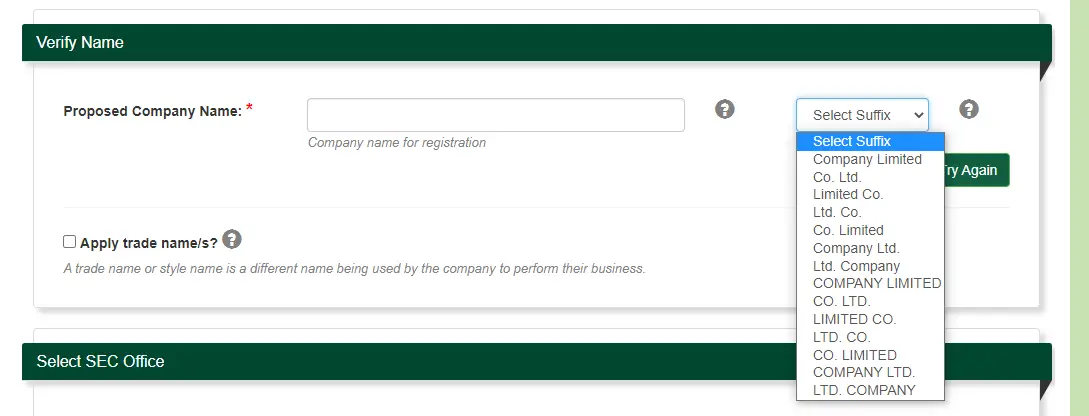
Tick the box ‘Apply trade name(s)’ if you plan on using a different name. The SEC will also validate your proposed trade name(s).
Finally, choose the SEC office/branch you want to submit and file your documents.
Confirm Verification Summary for Partnership
You’ll be given a summary of the details provided in the previous step. Verify and confirm this when you’re satisfied. Keep in mind though that no changes may be made once you choose to confirm.
Add Partnership Company Information
When you’re done with the confirmation, select the relevant answer for the economic zone. A certificate of authority will be submitted for business enterprises within economic zones.
Complete the principal address of your business and proceed to the next step.
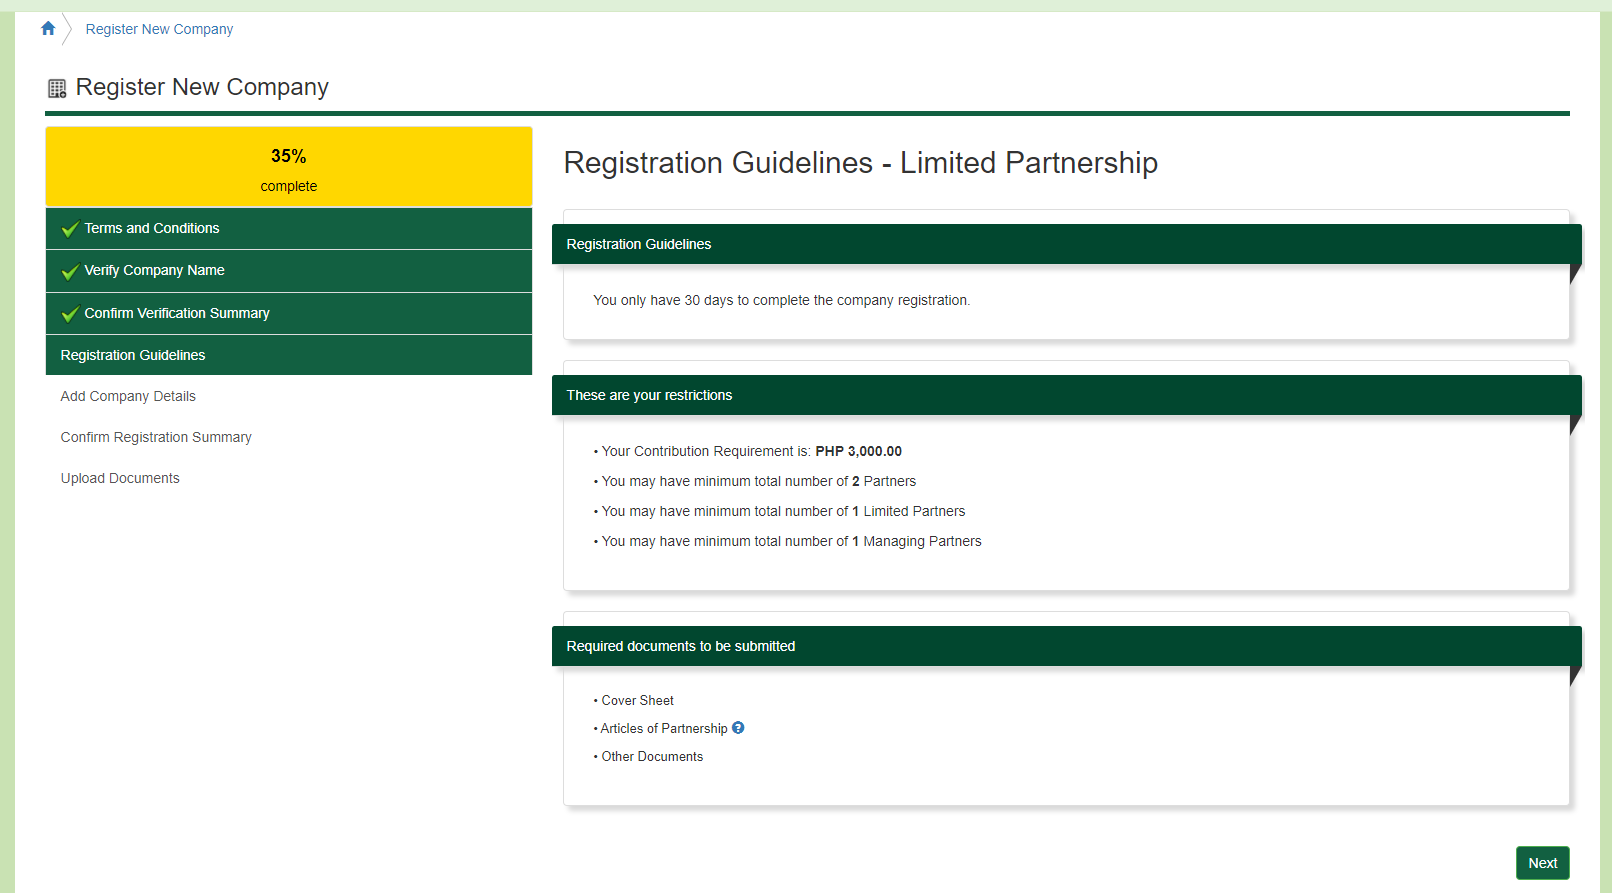
Registration Guidelines for Partnerships
A list of guidelines, restrictions and required documents will be enumerated relevant to your chosen company type and classification.
Add More Partnership Company Details
Under this step, additional company details such as the following are to be specified and defined:
- Purpose of the business
- Term of Existence (Up to 50 years)
- Names and information of individual partners (e.g. TIN)
- Names and information of corporate partners (e.g. TIN)
- Contribution details
- Contact Details of Contact Person
All necessary information should be completed before proceeding to the next step.
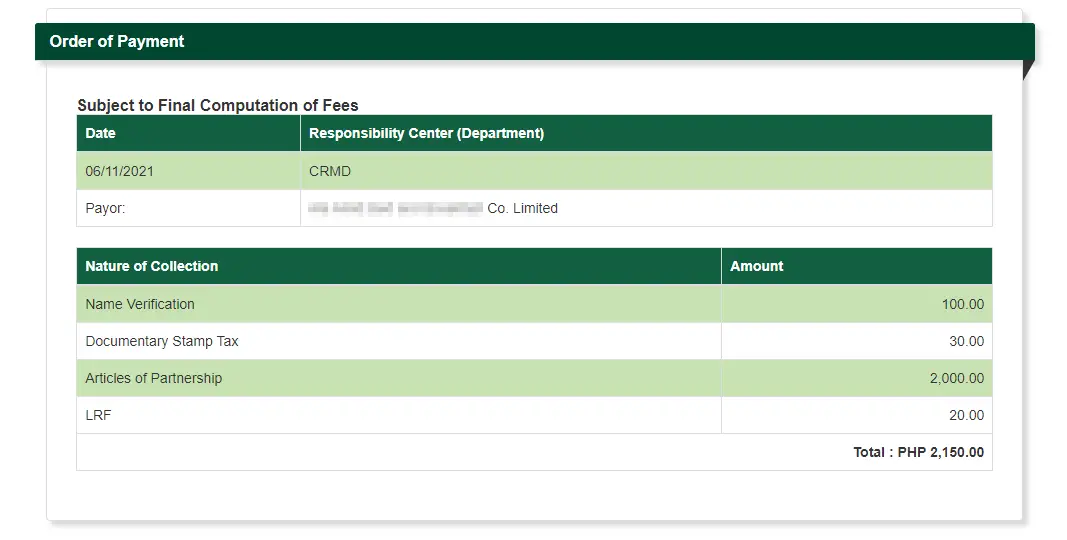
A registration summary will then be displayed for your review and confirmation. Take note of the summary of fees at the end of the page. Click ‘Next’ to proceed to the last step.
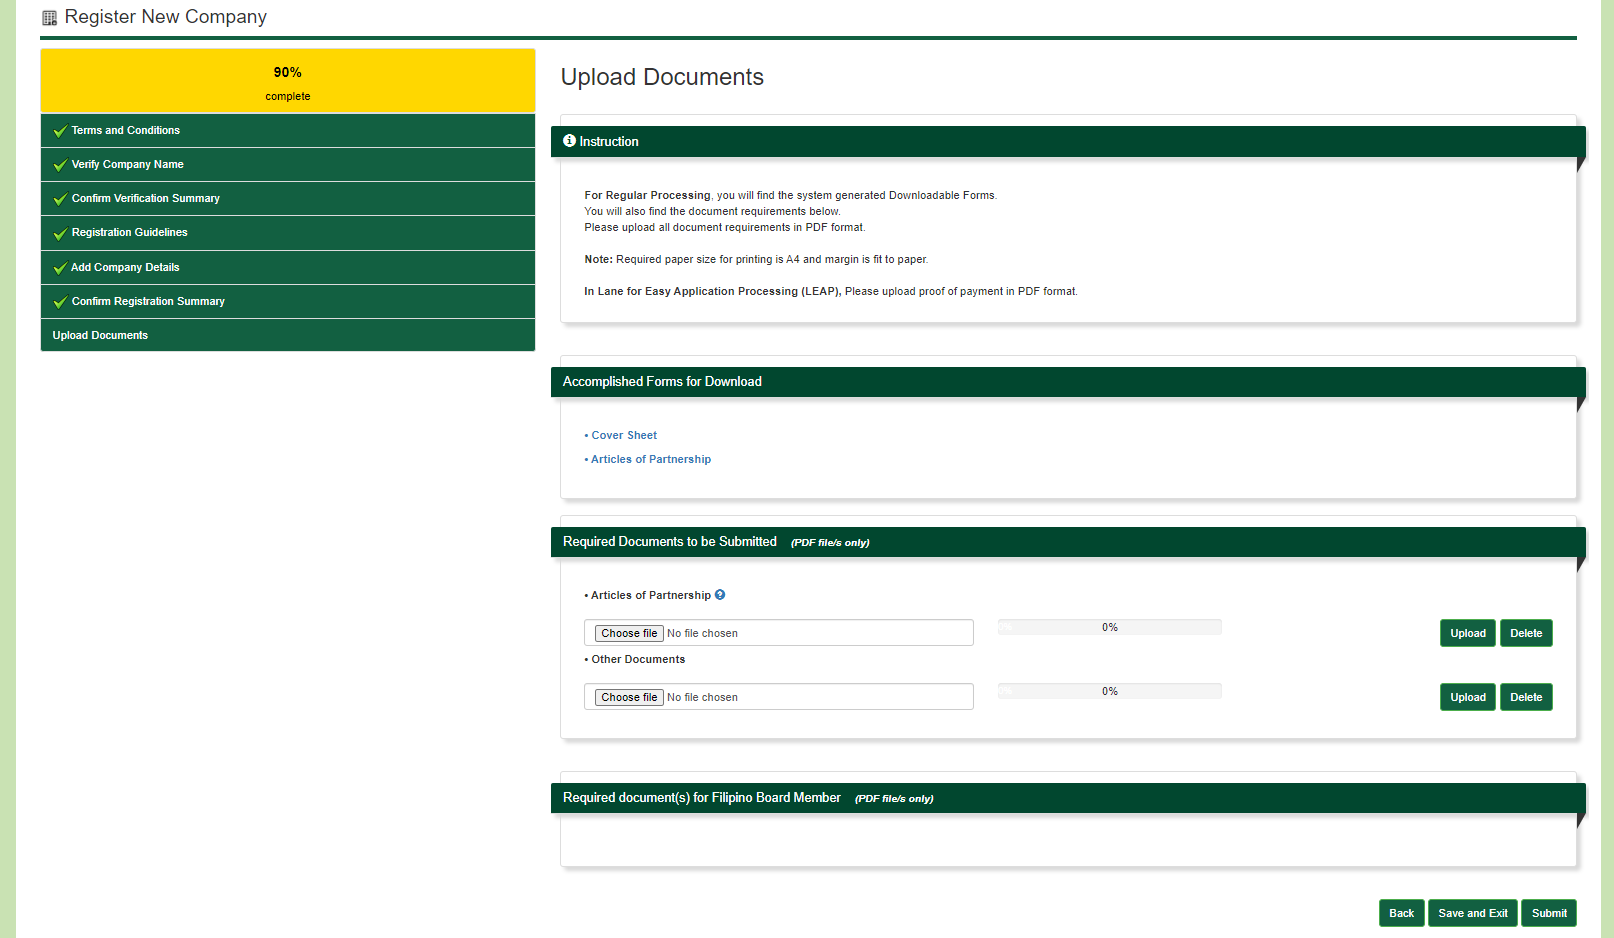
The last step is for uploading the required documents. Read the instructions carefully and attach the necessary files. Click ‘Submit’ and wait for the SEC email for the status of your application. Have your documents notarized when you receive the approval email.
Steps to Register Regular Domestic Corporations and OPCs in the Philippines
Don’t forget, the correct link for domestic corporations is this: https://secwebapps.sec.gov.ph/application
Follow the link provided and proceed to the application form.
Name Verification of the Corporation
For the ‘Name Verification’ procedure, you will want to have the following information ready:
- Preferred SEC office/branch for submission and filing of your application
- Contact details of the applicant or an authorized representative
- Company type, subtype, classification and subclass, major industry classification, and group
Here’s a list of your options:
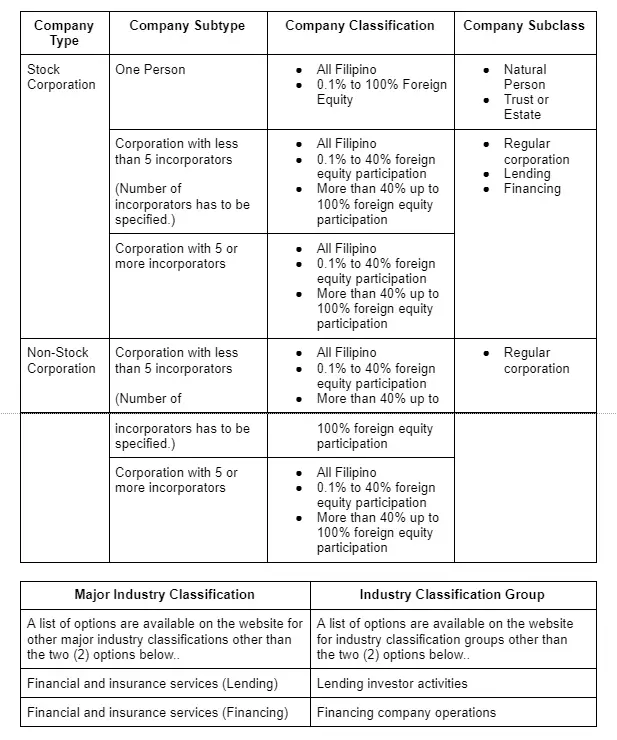
- Company name and trade name details, if any
Once you complete these details, a summary of the provided information will be available for preview and confirmation. Your OTP (sent to your email) is a requisite to proceed to the next step.
Corporation Company Details
Next, you’ll provide your company details such as purpose, principal office address and business contact information.
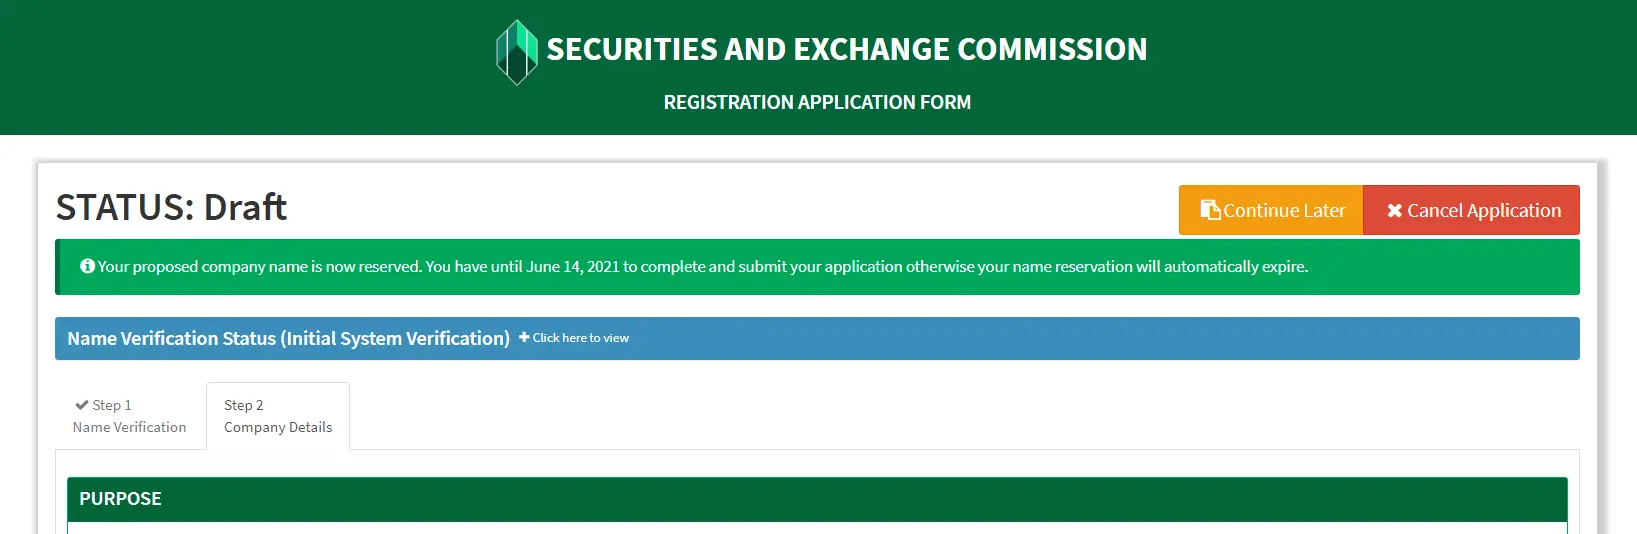
Also on this page is an option to reserve your company name. You will be given three (3) days to complete and submit your application.

Capital Structure and Other Details of the Corporation
This step will require the following:
- Capital structure details
- Authorized Capital Stock details
- Annual Report Year-End (Fiscal or Calendar Year)
- Term of Existence (OPCs have perpetual existence)
- Business activity (The list of options is available on the website)
Corporation Officers
You will also need the personal information of the treasurer, stockholder with subscription details, nominee, and alternate nominee. (Nominees and alternate nominees apply only to OPCs.)
File Uploading for Corporation Applications
This step is necessary only if supplementary files are required.
A summary of the information provided and system-generated forms will be available for your review and verification once everything has been submitted.
When you confirm that the information is complete and correct, select Submit Application. (See this screenshot for your reference.)
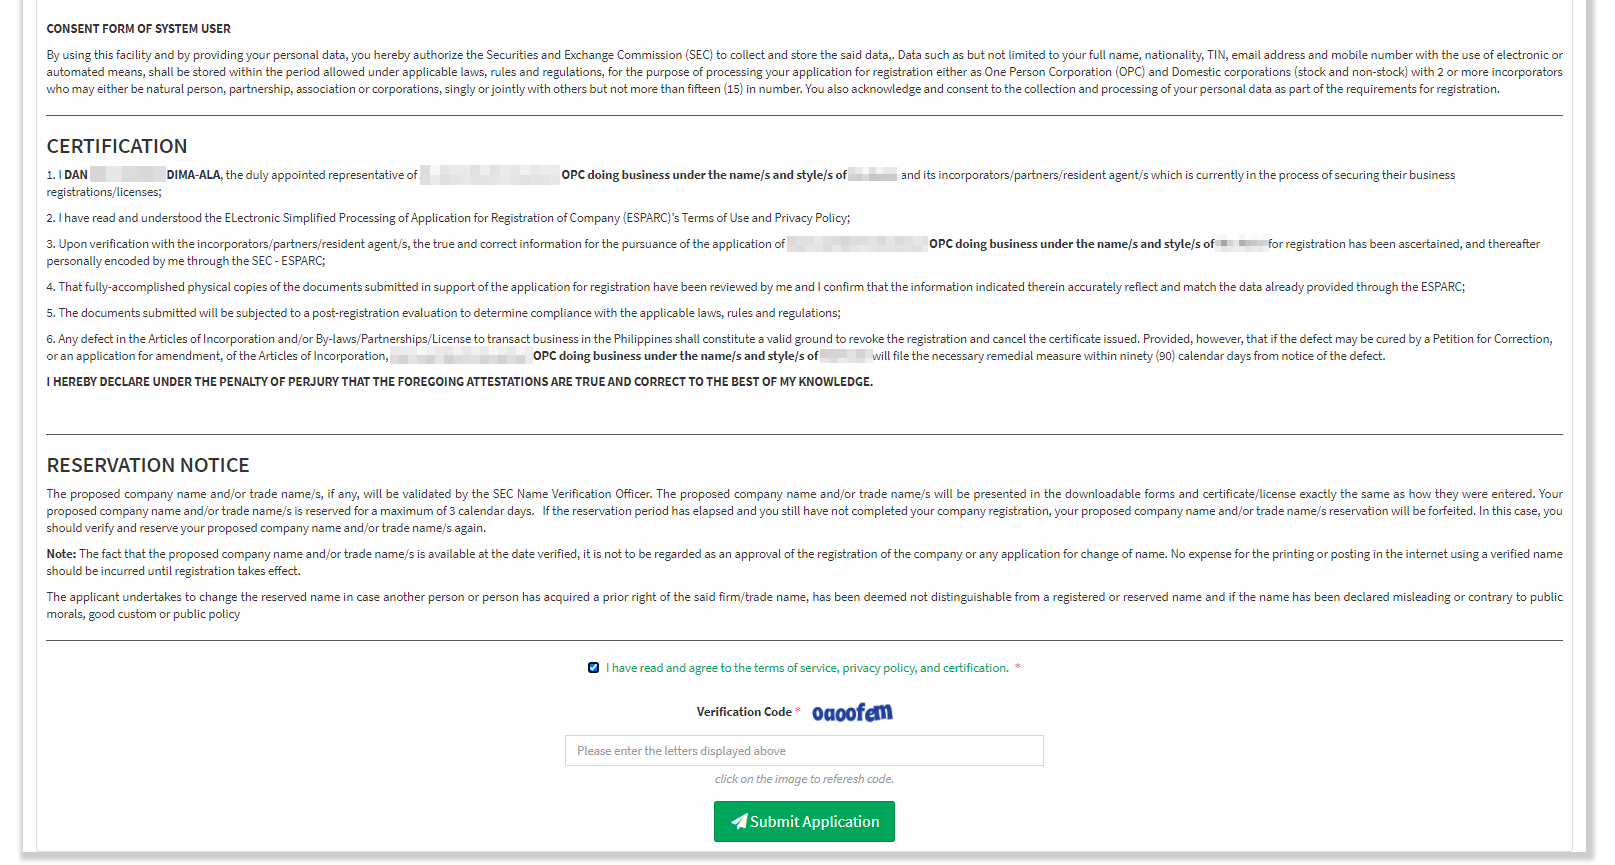
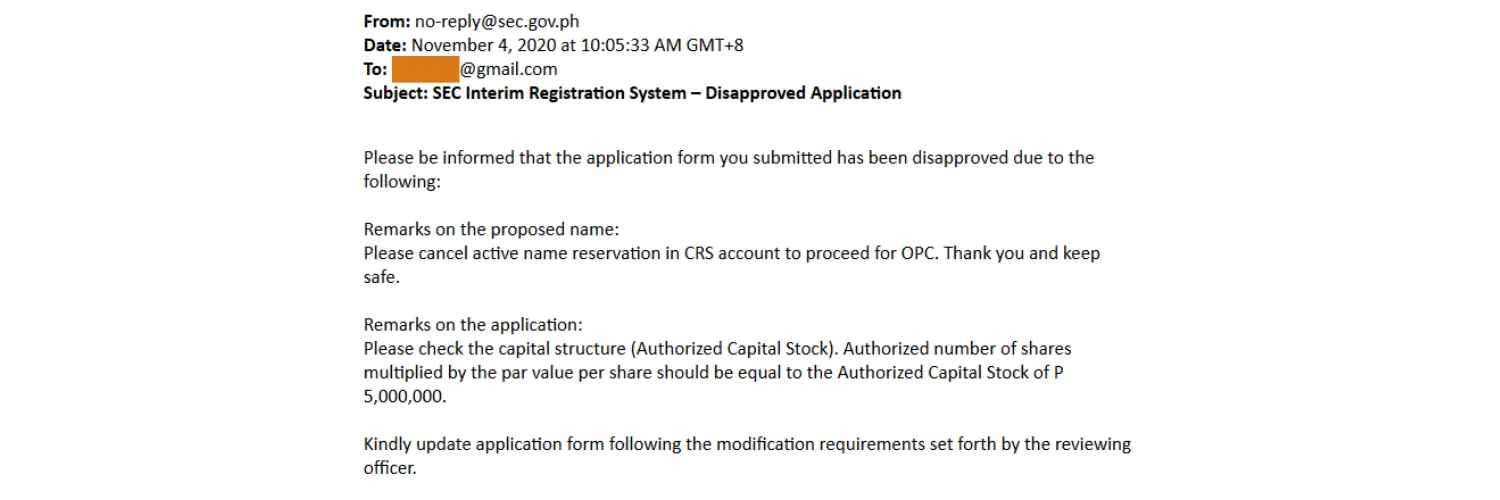
Typically, a few amendments happen. For example, it is common for people to incorrectly compute the authorized capital stock portion. Not a big deal though and you can always revise as instructed.
Tip: Complete the application form and note your Application Reference Number, as well as the email address provided in the form. You will want to keep track of these in case you decide to finish your application at some other time.
Be mindful of the exact type of corporation you’d like to register — whether that’s a regular domestic corporation or a one-person corporation. The SEC will reject duplicate applications under the same business name even if one is a regular domestic corporation and the other is a one-person corporation.
(It should be noted that, prior to writing this post, the website for partnerships and regular domestic corporations was one and the same.)
To avoid problems, it’s probably best to make a note of all user accounts and passwords in case you want to make changes. In our case, this error was resolved by logging on to the SEC’s website and removing the existing active application. (But also worth noting is that applications expire after 30 days anyway.)
Once you get the email approval from the SEC, you may now print the required forms (listed below) and have the registration papers notarized.
- Application Summary Form
- Cover Sheet
- Articles of Incorporation
- Letter of Acceptance of the Nominee and Alternate Nominee
Tip: Print at least five (5) copies of the notarized papers. One (1) copy is usually kept by the lawyer and the other copies are for the SEC and for your documentation.
Settle the required fees
The email approval will include a payment assessment form and your registration fees. You may pay these fees through a credit or debit card or PayMaya wallets. Over-the-counter payments at any SEC office or branch are also accepted.
You should also submit or send all the required papers, and proof of payment, within one month from payment of registration fees. After payment, all that’s left to do is wait for the SEC’s advice on the release of your certificate of registration.
Step 2: Barangay Clearance
This step answers the question How to Get a Barangay Clearance in the Philippines.
After completing your DTI (sole proprietorship) or SEC (partnership or corporation) registration, step 2 is to apply for your Barangay Clearance. Requirements are specific to your barangay, but some of the common requirements include (but are not limited to) the following:
- Original and photocopies of DTI or SEC registration certificate
- Contract of lease or proof of ownership of land, whichever is applicable
- Valid IDs
- Community Tax Certificate (CTC) or Cedula
- Sketch map of business location
I’ve found the Barangay Clearance application to be the easiest to process, with the entire procedure completed in less than an hour. (But again, your barangay might be different.) Prepare to settle a minimal Barangay Clearance fee — the actual fee will depend on your barangay.
Tip: A representative, with an authorization letter and your valid ID, may process your Barangay Clearance on your behalf.
Step 3: Business Permit (Mayor’s Permit)
This step answers the question How to Get a Business Permit (Mayor’s Permit) in the Philippines.
Your business permit, also called the mayor’s permit, is renewed every year. To apply for a mayor’s permit, you’ll need the following:
- DTI or SEC Registration
- Barangay Clearance
- Contract of lease or proof of ownership of land, whichever applies
- Valid IDs
- Community Tax Certificate (CTC) or Cedula
- Sketch map of the business’s location
Business Permit/Mayor’s Permit Rates
First-time applicants will be billed at the minimum rate, while business taxes for renewals are computed using the annual gross sales reported in the previous year’s audited financial statements (AFS) or income tax return (ITR).
The actual business tax rates and related fees will depend on the city or municipality of your business.
Also, expect additional requirements specific to the nature of your business. For example, PCAB registration is required for general contractors; or a copy of the franchise is required for tricycle operators.
You’ll be issued your Mayor’s Permit, business plate, and sticker upon payment of the registration fees.
Here are some other related requirements you’ll have to comply with within a certain period from the issuance of your business permit (The exact timeline will be determined by your local government.):
- Occupancy Permit
- Sanitary Permit (Health certificates of owner and employees)
- Fire Permit
- CCTV Compliance Certificate
- Social Security System (SSS) Compliance
- Philhealth Compliance
- Home Development Mutual Fund (HDMF) Compliance
Tip: Check your LGU’s website for the most recent updates. Some have set their online platform’s acceptance of registration, renewal, and payment of business permits.
Step 4: Bureau of Internal Revenue (BIR)
(Recent changes have made it possible to file BIR registrations after Step 1. Prior to this update, businesses were required to present their Mayor’s Permit before registering with the BIR. To learn more, read the Revenue Memorandum Circular No. 57-2020.)
Tip: You may have your representative process the application on your behalf. A Special Power of Attorney will be required.
You will need a taxpayer’s identification number (TIN) before registering your business with the BIR.
Other requirements for your company’s BIR registration include the following:
- 2 duly filled out originals of the BIR Form No. 1901 or 1903
- 1 photocopy of any government-issued ID for non-practitioners of a profession (2 copies of PRC ID and government-issued ID for practitioners)
- DTI or SEC registration
- Contract of lease or proof of ownership
- Other requirements depending on the nature of your business
BIR Payment of Fees
BIR fees will be collected for the registration of your business and printing of the BIR Certificate of Registration (COR) (Form 2303).
Tip: Similar to DTI and business permit, you must renew your BIR Certificate of Registration (Form 2303), which is due every 31st of January.
Once the COR is released, the next step is to register your books of accounts and process your application for Authority to Print for the receipts/invoices.
Tip: As recently as a few days ago, June 8, 2021, the BIR launched an online platform for business registrations, further streamlining the process. You may access this service at BIR NewBizReg.
A step-by-step guide is shown on the first page of the link provided and, quite frankly, it’s the perfect resource and you probably don’t need me to write about it.
If you want to see the detailed list of requirements, select the relevant business structure type (sole proprietorship, partnership, etc.) and a new window with the catalog will appear.
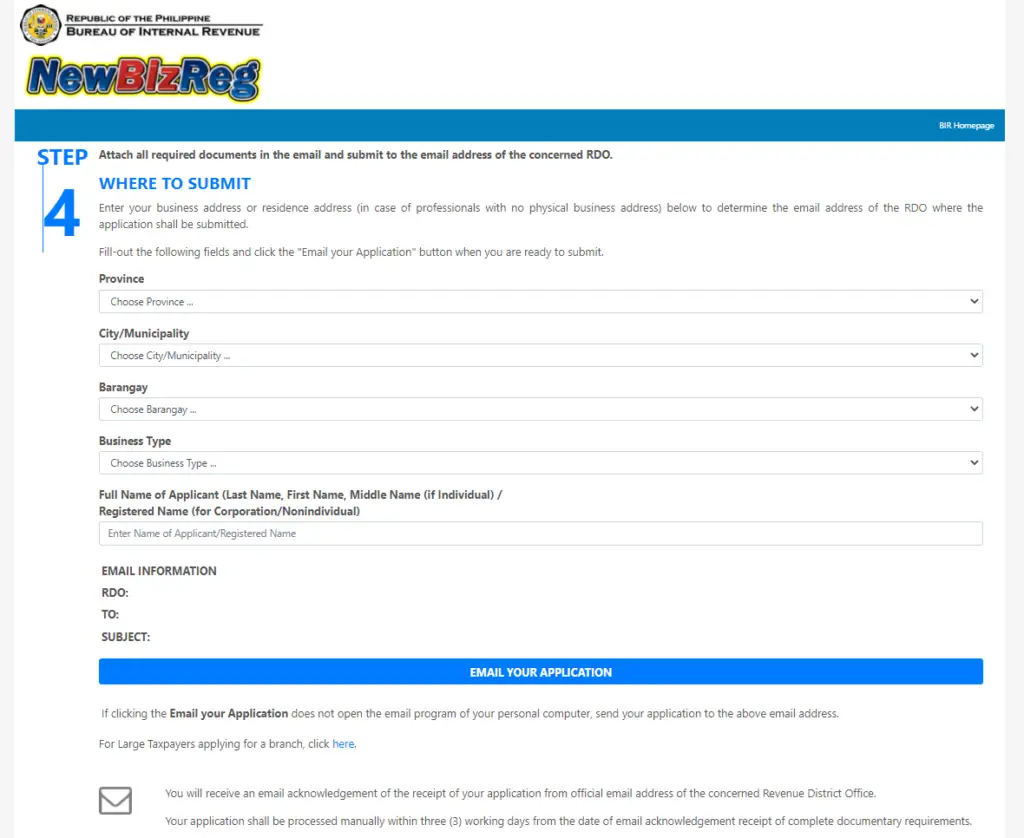
Then, answer the questionnaire provided on the website.
You will then have to send this (answered) questionnaire, and the other requirements, to a BIR email address — the exact email address will depend on the place of principal business (i.e., will depend on your answers here — see screenshot)
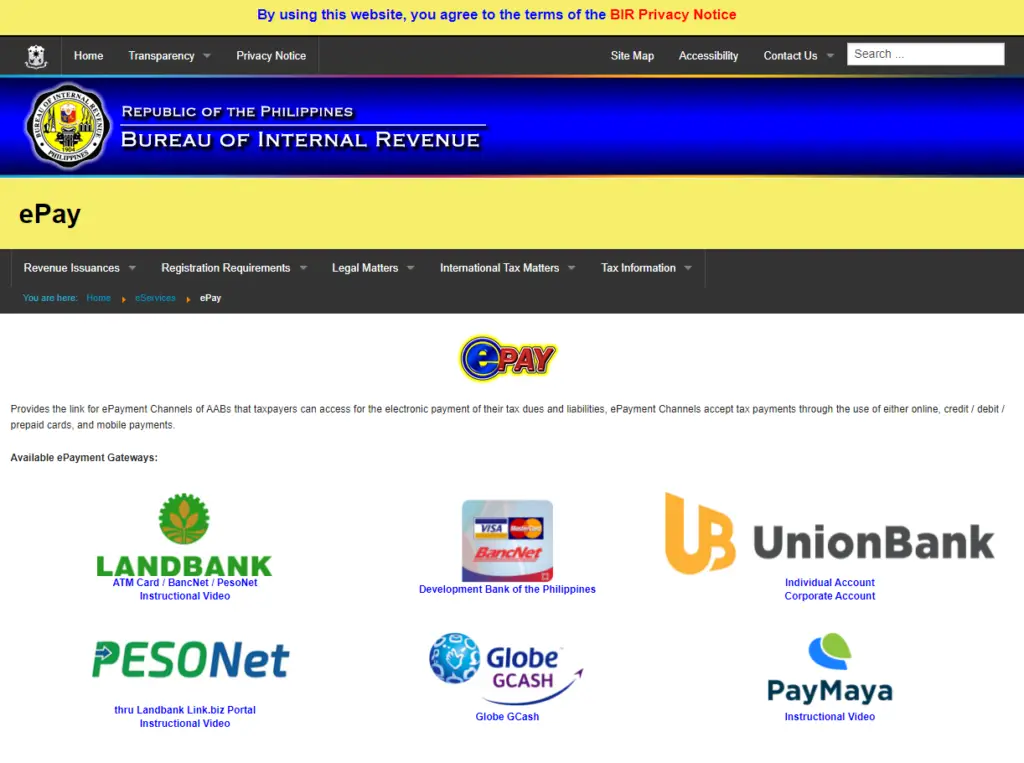
How to Settle the BIR Registration Fee
The BIR has a list of online payment channels to choose from. Links and videos are also available on the website.
From my experience, the total processing time varies. It certainly will depend on the completeness of the requirements sent, so try not to miss out on anything. Make sure you upload all the relevant documents to avoid delays.
The BIR will send you an email on the status of your registration.
Step 5: SSS, PhilHealth, and Pag-IBIG
This step answers the question How to Register Your Business with the SSS, PhilHealth, and Pag-IBIG.
For this step, you will need an initial list of employees with their member information (i.e., as a member of SSS, PhilHealth, and Pag-IBIG) and the employer’s form.
- SSS: Print and fill out 2 copies of the SSS R1 Downloadable Form and 1 copy of the Specimen Signature Card
- PhilHealth: Print and fill out two (2) copies of PhilHealth ER1 Downloadable Form
- Pag-IBIG: Print and fill out 1 copy of the Employer Data Form and submit the Specimen Signature Form
Once you have these, submit the DTI or SEC registration, business permit, 1×1 recent picture, and photocopies of valid IDs as attachments to your applications. Prepare an authorization letter if a representative will process the registration on your behalf.
At the time of this article, all employers are required to create an SSS and PhilHealth account online to generate the SSS payment reference number (PRN) and the Statement of Premium Accounts (SPA). These will be presented for payment.
How to Pay Your SSS, PhilHealth, and Pag-IBIG
Payments for the SSS monthly contributions may be made online or over the counter with the accredited collecting agents banks or at your nearest SSS branch.
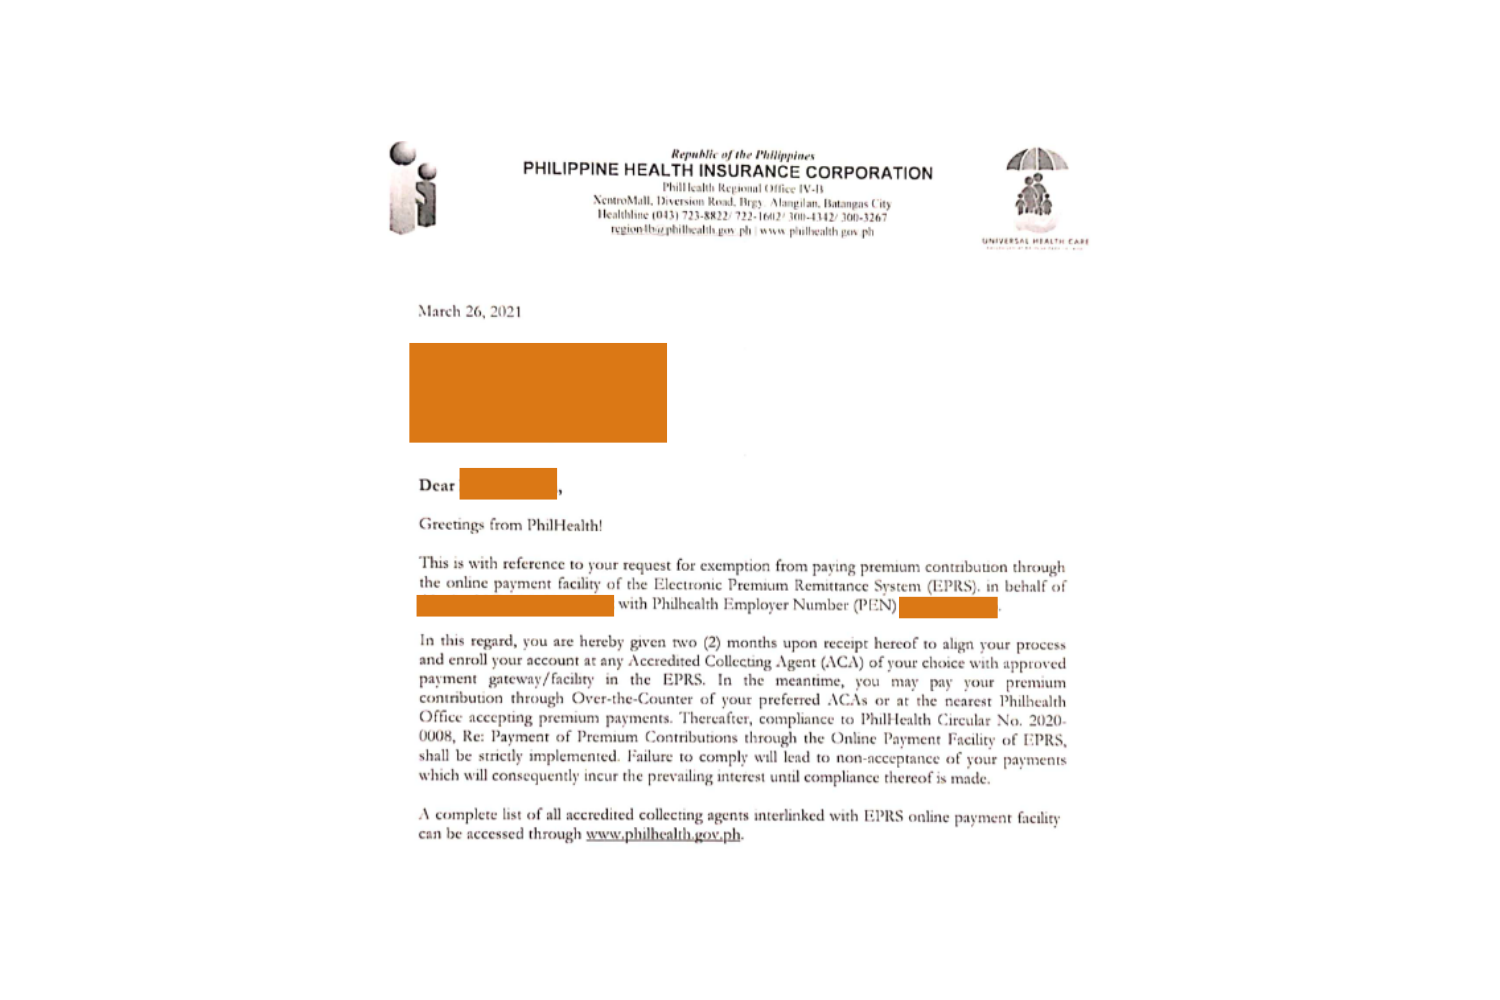
Philhealth, on the other hand, is transitioning to a fully automated process – from the generation of SPA to the payment of contributions. Employers are now mandated to enroll with the agency’s accredited collecting agent (ACA).
A Certificate of Exemption will be given to employers granting them a two-month grace period to comply with the bank enrollment. Over-the-counter payments at the Philhealth branches will be accepted within the grace period.
Step 6: Department of Labor & Employment (DOLE)
This step answers the question How to Register Your Business in DOLE.
All business establishments are required to register as detailed in Rule 1020 of the Occupational Safety and Health Standards.
The following are the required forms and attachments for the registration:
- Duly filled out Establishment Registration Form
- DTI or SEC Registration
- Business permit
- Sketch map of the business’s location
Tip: DOLE authorized representatives do yearly surprise audits on select establishments. Make sure you’re always in compliance with labor law and standards.
Conclusion
I should say that the last step is to display all the relevant certificates, forms, and business plates at your business store. This isn’t just a vanity thing — most agencies actually require it.
But your responsibility as a citizen and business employer does not end with the registration of your business. Always make sure you comply with the monthly, quarterly, and annual reports required by these agencies, as well as keep a note of the deadlines for renewal to avoid fines and penalties.
COVID hasn’t been good to the economy, to say the least, but it’s not all bad. The wide adoption of online platforms has certainly been part of the silver lining. Processes, for both the private and public sectors, are constantly improving, and that only benefits the economy as a whole.
===
This guide is for business registrations in the Philippines. The contents of this post are accurate at the time of writing. But changes in presentation, outline, and overall process, are expected to change over time. I’d be happy to receive comments to keep this post updated.
Summary
Checklist
Click download for a PDF with links to the appropriate websites.